| Note: This tutorial assumes a basic understanding of ROS and the ROS action library. |
| |
Writing a Stiffness Controller (Python)
Description: Shows how to use the force/impedance controller to do stiffness control with the PR2 arm using python.Keywords: force, compliance, stiffness, controller, pr2 arms
Tutorial Level: BEGINNER
Next Tutorial: Running the Controller
Contents
Downloading the Controller
If you already have already checked out the mit-ros-pkg, you can skip this step.
Download the ee_cart_imped stack, which contains the ee_cart_imped_control, ee_cart_imped_action, ee_cart_imped_launch, and ee_cart_imped_msgs packages, using these instructions.
You now have all the files needed for running the controller and the action server. We will discuss how to compile and run them in the next tutorial, but first we will show how to use the controller to run a low impedance trajectory.
The Code
First, create a package for this tutorial. Open a new shell, navigate to a directory on your ROS_PACKAGE_PATH in which you wish to do the tutorial and type
roscreate-pkg ee_cart_imped_tutorial rospy ee_cart_imped_action
Within that package, create the scripts/stiffness_control.py file and paste the following inside it:
   1 #!/usr/bin/env python
   2 import roslib; roslib.load_manifest('ee_cart_imped_tutorial')
   3 import rospy
   4 import ee_cart_imped_action
   5
   6 def main():
   7     control = ee_cart_imped_action.EECartImpedClient('right_arm')
   8     control.addTrajectoryPoint(0.5, 0, 0, 0, 0, 0, 1,
   9                                1000, 1000, 1000, 30, 30, 30,
  10                                False, False, False, False, False,
  11                                False, 4, '/torso_lift_link');
  12     control.addTrajectoryPoint(0.75, 0, 0, 0, 0, 0, 1,
  13                                50, 1000, 1000, 30, 30, 30,
  14                                False, False, False, False, False,
  15                                False, 6, '/torso_lift_link');
  16     control.sendGoal()
  17
  18 if __name__ == '__main__':
  19     rospy.init_node('stiffness_control_test')
  20     main()
Client-Server-Controller Model
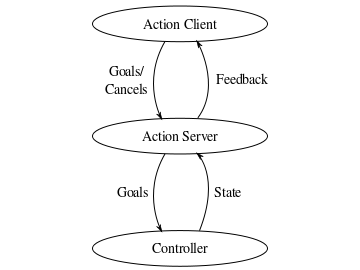
Before we examine the code in depth, let's go through the basic outline of the ROS message passing for our controller. The diagram below shows the structure

At the bottom level, we have the force/impedance realtime controller from the ee_cart_imped_control package. However, the controller should never be accessed directly at this level because there is no monitoring. For example, if the controller is shut off, there is no way of knowing that. Therefore, all interaction with the controller should be done through the ee_cart_imped_action, which monitors the controller and the trajectory and can abort the trajectory if the controller is no longer responding or the trajectory violates user-defined constraints. The action itself is an action server.
To communicate with an action server, an action client is used. You may write your own client to interact with the ee_cart_imped_action, but we have also provided one in the EECartImpedClient class. This class is a wrapper around the simple action client and should be sufficient for almost all uses of the controller.
Examining the Code
Now, let's break the code down.
4 import ee_cart_imped_action
This line imports the action client.
7 control = ee_cart_imped_action.EECartImpedClient('right_arm')
This is the instantiation of the EECartImpedClient. When instantiating the class, you must pass it the name of the arm you want to control. Here, we are controlling the right arm. If we wanted to control the left arm, we would pass in the argument 'left_arm'.
   8     control.addTrajectoryPoint(0.5, 0, 0, 0, 0, 0, 1,
   9                                1000, 1000, 1000, 30, 30, 30,
  10                                False, False, False, False, False,
  11                                False, 4, '/torso_lift_link');
  12     control.addTrajectoryPoint(0.75, 0, 0, 0, 0, 0, 1,
  13                                50, 1000, 1000, 30, 30, 30,
  14                                False, False, False, False, False,
  15                                False, 6, '/torso_lift_link');
Here, we are filling in a two point trajectory. The EECartImpedClient.addTrajectoryPoint function adds a trajectory point to the goal stored in the EECartImpedClient. Specifically, addTrajectoryPoint(goal, x, y, z, ox, oy, oz, ow, fx, fy, fz, tx, ty, tz, isfx, isfy, isfz, istx, isty, istz, time, frame_id) adds a point to goal with position (x, y, z) and orientation as the quaternion (ox, oy, oz, ow) in frame frame_id. The force or stiffness in the x, y, and z directions are given by fx, fy, and fz respectively. The torque or rotational stiffness around the x, y, and z axes are given by tx, ty, and tz respectively. The booleans isfx, isfy, and isfz are true if the arm should exert a force in the x, y, or z directions respectively and false if it should maintain a stiffness. Similarly, the booleans istx, isty, istz are true if the arm should exert a torque around the x, y, or z axes respectively and false if it should maintain a rotational stiffness. The time is the time from the starting time of the trajectory that this point should be reached. For the two points shown here, the PR2 will first move its gripper to approximately the center of its body using maximum stiffness. This move will take 4 seconds. It will then extend the gripper forward, but using only a very small stiffness in the x direction. Alone, this move will take 2 seconds as it is scheduled to complete 6 seconds from the start of the whole trajectory.
WARNING: To prevent overdriving the controller, rotational stiffness should never be set above 75. Translational stiffness should never be set above 1000.
16 control.sendGoal()
Once the trajectory we have finished creating the trajectory, we send it to the server and start the execution. This line will block until the trajectory completes or is aborted.
Running the Code
Change your file to be executable:
roscd ee_cart_imped_tutorial/scripts
chmod +x stiffness_control.py
Now we are ready to run the code.


